In this post we take a detailed look at what causes frozen shoulder and the best exercises to help you recover as quickly as possible.

Frozen shoulder, or adhesive capsulitis as it’s known, is a medical phenomena that we don’t fully understand.
We know it hurts. A lot. And that it causes large restrictions in range of motion.
It’s also associated with other conditions that are both inflammatory and autoimmune in nature.
We know that diabetics are more likely to be affected and there’s strong evidence to connect it with Dupuytrens disease. A condition that causes contracture of the hands.
Other diseases with links include cardiovascular disease and so called metabolic syndrome, the hallmark of which is chronic low grade inflammation.
Up until now it was thought the condition had a natural process and that if all else failed, most cases would resolve themselves with time. This has been refuted by recent research which suggests if left unattended, pain and restrictions can linger.
So what’s happening inside your frozen shoulder?
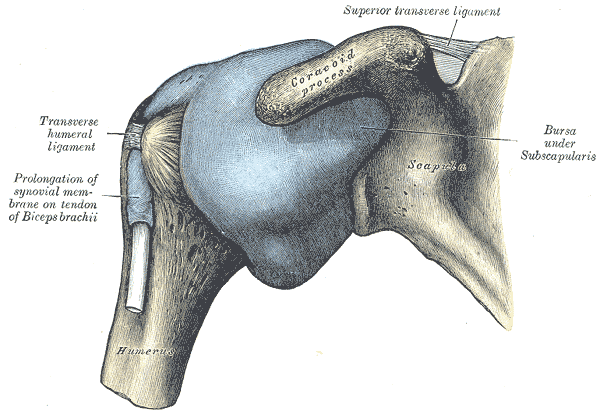
In some cases of frozen shoulder the joint capsule (pictured in blue above) changes shape and becomes sticky. Hence the name, adhesive capsulitis.
The capsule surrounds the shoulder joint and can be thought of as a protective envelope.
The outside of the capsule is fibrous in structure, whilst the inner surface has a synovial membrane that keeps the joint lubricated. This also ensures smooth passage of the capsule over the structures of the shoulder during motion.
It’s estimated that in 50% of frozen shoulder cases the capsule becomes contracted. At the same time strong collagen layers are added both to the capsule itself and to local ligaments.
The joint space is reduced from a normal range of 10-15ml, down to 3 or 4ml. This has the overall effect of limiting motion.
The reasons for this aren’t exactly clear. We know it’s more likely to occur after a period of immobilisation, such as post surgery or after time spent in a sling.
It’s also more common in people over the age of 50 and you’re at greater risk if you’re female.
The evidence also suggests the condition is related to underuse rather than overuse. The fact it’s more likely to occur in your non dominant shoulder seems to supports this observation.
The role of the muscular system in frozen shoulder
In 50% of cases there is nothing remarkable to see on a scan. The shoulder appears to be frozen by the muscular system rather than any changes to the capsule itself.
In a 2015 study frozen shoulder patients had their passive shoulder range of motion tested before and after receiving a general anaesthetic. The researchers noted that range of motion improved significantly in every patient whilst they were unconscious.
The restrictions these patients were experiencing were not related to structural changes to the joint therefore. But rather increased tension in the muscular system, or guarding as its known.
Muscle guarding is a protective mechanism that your central nervous system employs to keep you out of danger.
Think how you lose the ability to move after breaking a bone for example, or when you pull a muscle.
Your brain programmes movement in such a way to avoid placing any force through the injured area. This is an unconscious process that can’t be overridden.
What’s interesting about frozen shoulder is that there’s usually no obvious trauma involved. People often describe simply waking up in agony and being unable to move their arm as a result.
Why would your nervous system prevent movement?
What’s certain is that it’s not for fun.
The shoulder joint relies heavily on the muscular system for stability. The large variety of possible movements means the joint can’t be stabilised with multiple ligaments like the knee for example.
The evidence, albeit circumstantial, points to an inability of the muscular system to maintain the normal function of the joint. Your brain responds to this instability by locking the joint down to prevent potential injury.
Whilst you may not be able to think of a specific cause, this probably occurred over an extended period of time.
A gradual reduction in muscular system function ultimately caused by a lack of stimulus.
So is yours a structural issue or a muscular system one?
It’s obviously difficult to know whether your frozen shoulder is related more to changes within the joint itself or your muscular system. It may of course be both.
In one sense it doesn’t matter. If you choose to manage your shoulder with a conservative approach, then the goal is to improve the function of your shoulder muscles regardless.
If however there are no changes to the capsule attempting to stretch it, as is common in frozen shoulder rehab protocols, may not prove effective.
Where to start with frozen shoulder exercises
It’s important to note that whilst bringing some stability to your shoulder is probably necessary for a complete recovery, you may make some initial gains by addressing other risk factors.
For example, if chronic inflammatory conditions like metabolic syndrome are associated with frozen shoulder, eating foods that are proven to reduce inflammation may provide some relief.
Likewise increasing your activity levels to include more general exercise like walking may be helpful.
Scapula motion exercises
Finding a starting point at the shoulder can be difficult, especially when there’s pain present.
As the function of your shoulder joint relies heavily on motion of your shoulder blade (scapula), this is often a good place to begin. Especially as training scapula motion can usually be achieved without causing pain.
Frozen shoulders will typically be limited in abduction (moving your arm out to the side), flexion (moving your arm out in front of you) and external rotation (rotating your shoulder outwards).
There are particular scapula motions associated with each of these movements. Namely elevation (moving your shoulder up towards your ear) and retraction (moving your scapula back towards your spine).
Use the following assessments to check whether these motions are limited on your painful shoulder compared to your other side. Start each assessment with your non painful shoulder first.
Scapula elevation assessment
Stand upright in front of a mirror and slowly shrug one shoulder up towards your ear without side bending your neck.
Look at the gap between the top of your shoulder and your ear to assess the range.
Now try the other one and make a note if there’s a difference.
Scapula retraction assessment
Lay face down with your arms by your side and your forehead on a small towel. Bring one shoulder blade back towards your spine without lifting your hands from the floor or rotating your trunk.
Check how far you’re able to lift the front of your shoulder from the floor.
Now try the other one.
If this position causes you pain you can try the same motion in standing.
What to do if you find a limitation
If you found a limit on your painful shoulder in either elevation or retraction, first seek to improve the movement by repeating the test and holding your shoulder at your end range of motion for 5 seconds.
So for example if you had a limit in elevation, simply shrug your shoulder up towards your ear and hold it there. Repeat this process 5 times and you should see the range slowly improve.
Once you have improved the motion you can think about adding resistance to make further gains. This post will show you how to do this for both elevation and retraction.
Glenohumeral joint motion
Now let’s move out to the glenohumeral joint itself. This is where things may get a little more challenging.
Shoulder abduction assessment
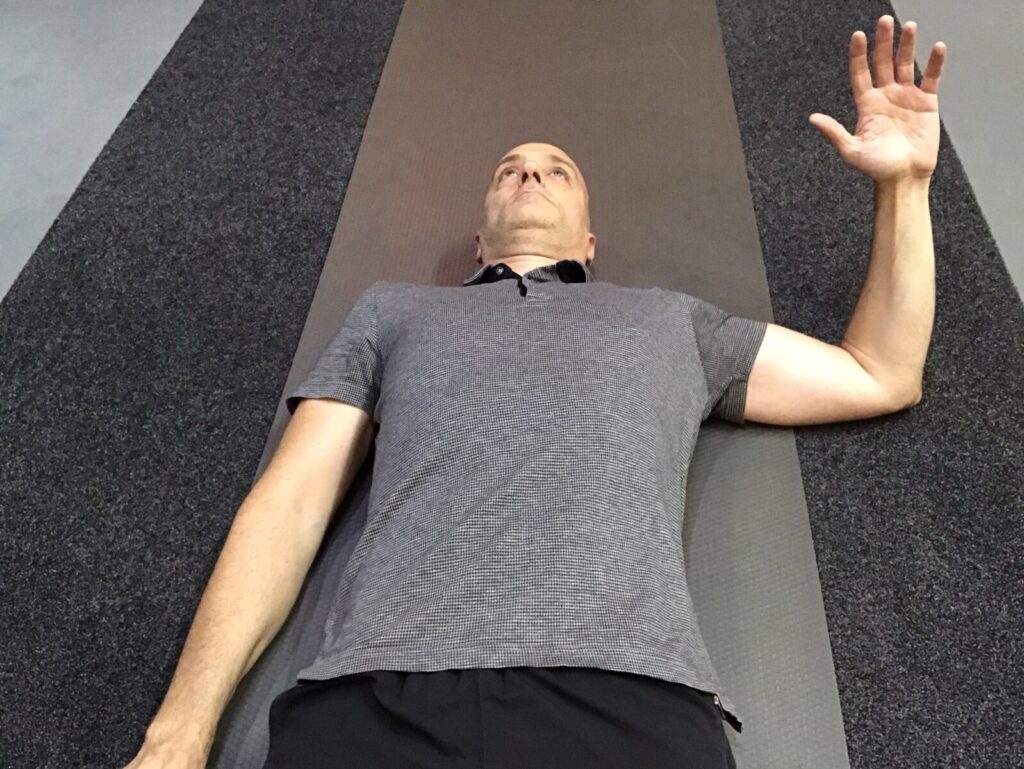
Lying on your back with your elbows bent to 90 degrees, slowly slide your arm out to the side as if trying to take your elbow up towards your ear. Note how much motion you have and compare it to the other side.
You may find the test itself is painful. If that’s the case, make a note of how much pain free motion you have available. If there’s zero, don’t push it, that’s fine.
External rotation assessment
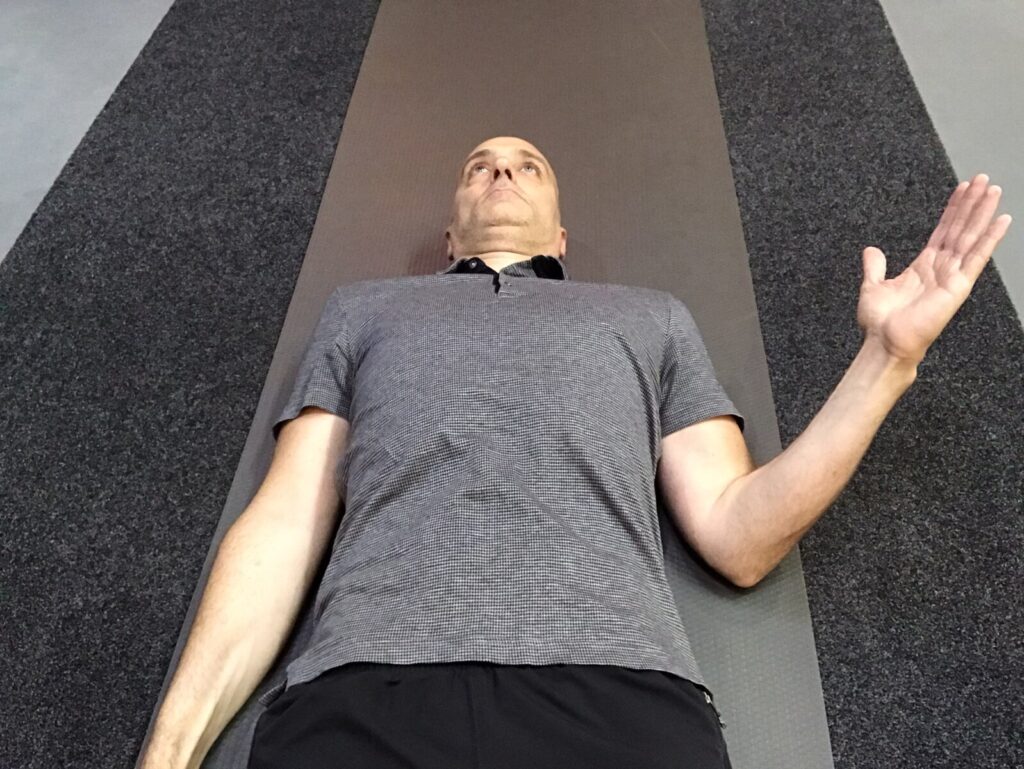
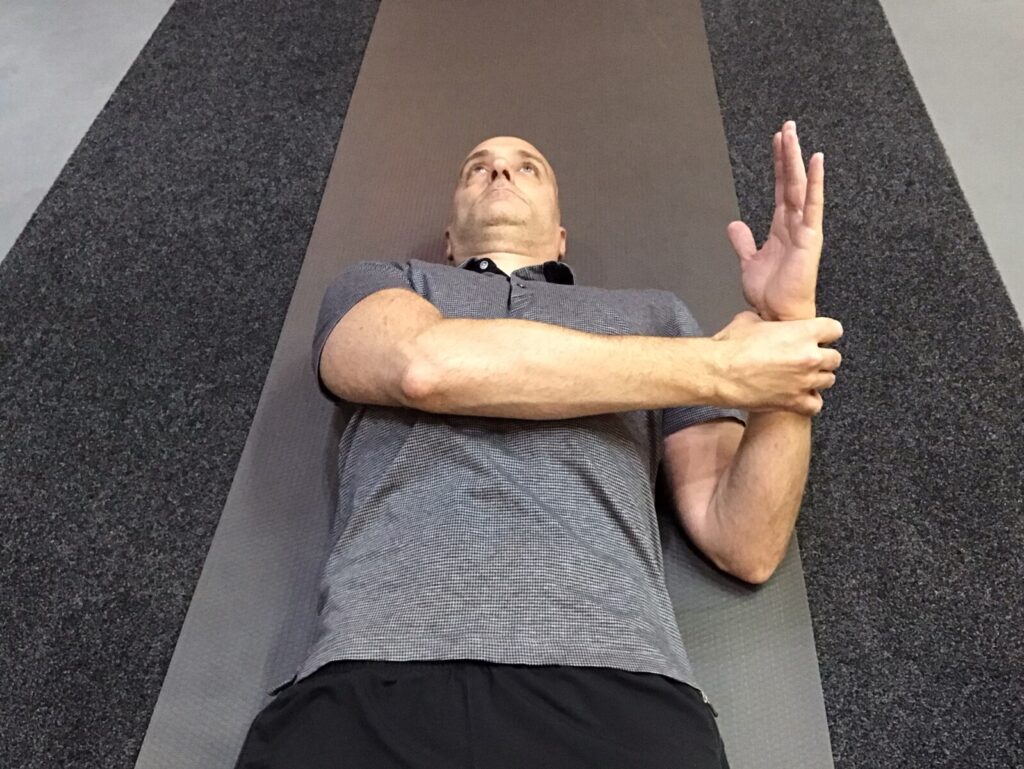
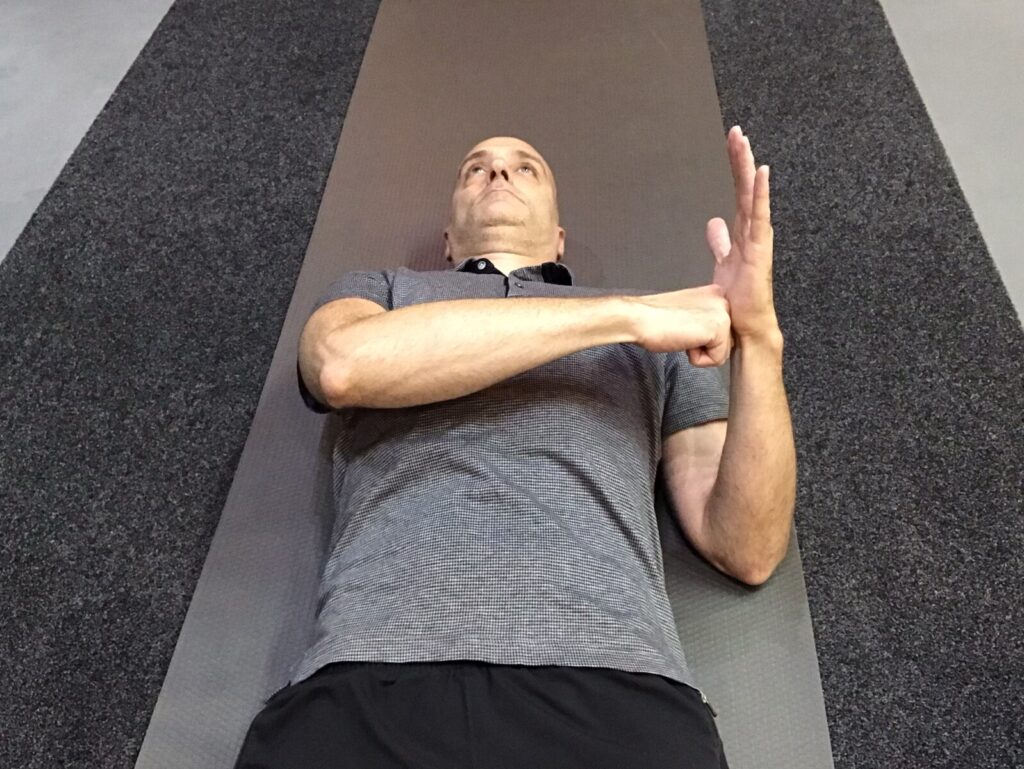
Next try externally rotating one shoulder so your hand moves towards the floor without allowing your elbow to straighten. Compare motion on the other side.
Again you may find this causes pain. If that’s the case note at which part of the motion the pain begins. If it’s from the start, don’t push any further.
Exercises to improve these motions
As we’re entering the belly of the beast, we’ll need to be a little creative. The goal is to stimulate the muscles involved in these motions without causing pain.
Our primary method is isometrics. These are muscle contractions without motion at the joints those muscles act upon. Isometrics are useful because they enable us to target muscles precisely and stay out of painful positions.
They have been shown to increase strength at the joint angles they target and reduce pain. Two things we would like to achieve.
Abduction isometrics
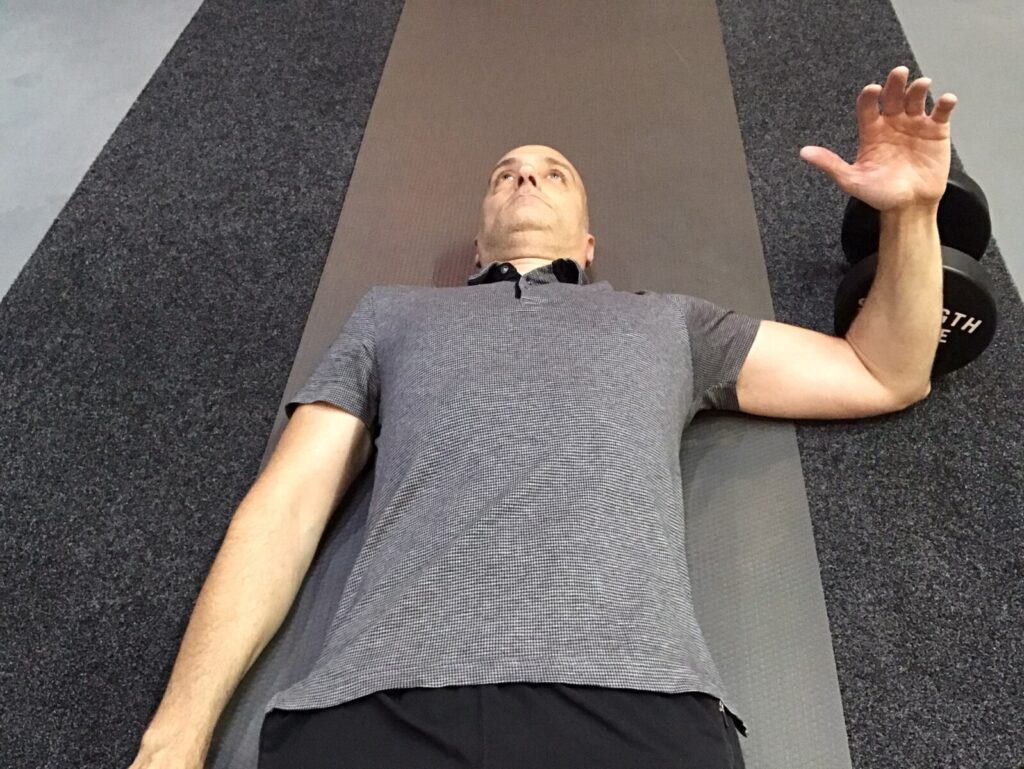
First find your pain free limit of abduction. Once there place a heavy object on the outside of your upper arm that won’t move if you push into it.
Gently push out into the object with 10% of your available strength.
If you can do this without creating pain, fantastic, you have a starting point. If you can’t, experiment with bringing your arm a little closer to your side.
Should you find every position causes you issues, try the next exercise.
Isometrics on the opposite side of the joint
If you can’t push out without causing pain can you pull in?
It might sound crazy but it’s possible to elicit muscle activity on one side of a joint by working on muscles that are responsible for the opposite motion.
When you perform a bicep curl for example, your triceps don’t simply relax. They contract at the same time to manage the forces at your elbow joint.
We’re going to use the same principle to target the shoulder abductors by working on the shoulder adductors.
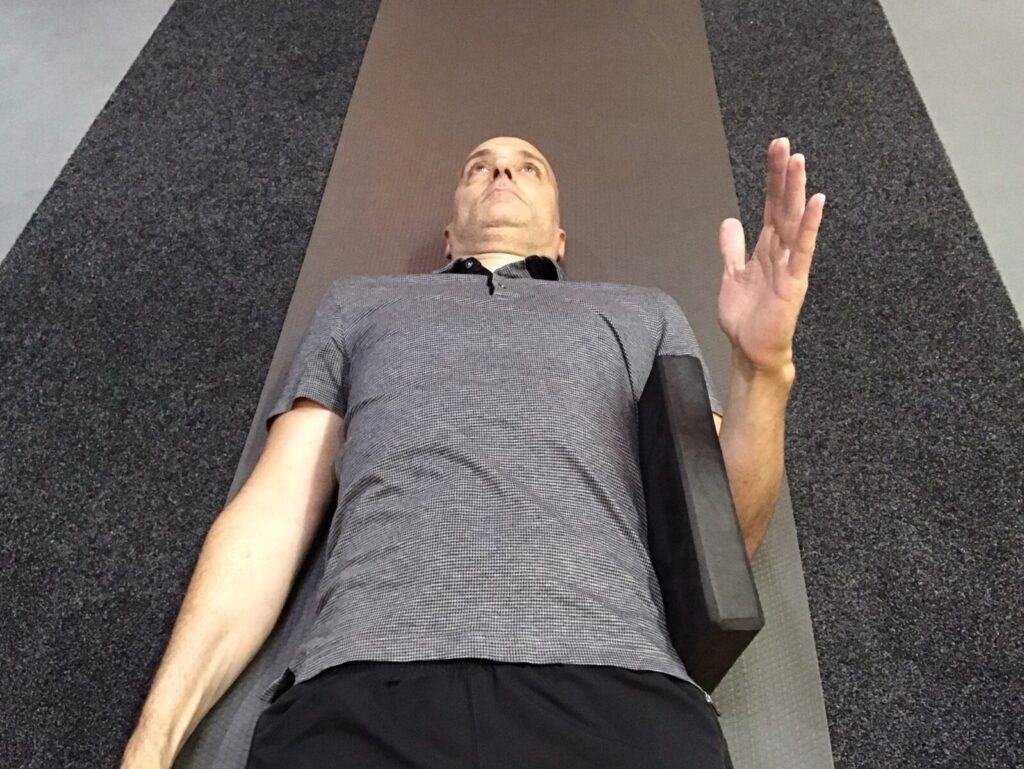
Place a book between your upper arm and the side of your trunk. It shouldn’t be too thick as this will force your shoulder into abduction.
Bend your elbow up to 90 degrees and gently squeeze your upper arm inwards against the object. Hold 5 seconds and repeat a further 5 times if you can do so without pain.
External rotation isometrics
As with the previous exercise, we’ll first try to find a position where you can comfortably contract your external shoulder rotators without causing pain.
Try this initially at the external rotation limit you noted in the assessment. Bring your other arm across your body and apply a brace around the outside of your forearm. Gently rotate out as if trying to externally rotate further.
If this causes you no pain, awesome. You have a starting point. Perform 5 x 5 second contractions in this position.
Should this cause you issues, rotate your shoulder inwards a little so your palm moves closer to your body. Try externally rotating against your hand in this position and if not successful, at 15 degree intervals until you run out of internal rotation.
Still no joy?
Ok we’re going to topsy turvy it.
Isometrics on the other side of the joint
If you can’t rotate out without pain, can you rotate in?
Starting at your limit of shoulder external rotation with your elbow at 90 degrees, this time gently rotate your shoulder inwards against the resistance of your other hand.
If you feel no pain, great news. Start there with 5 x 5 second contractions.
Should this still provoke discomfort, rotate your shoulder inwards a little and try again there. Repeat this process at 15 degree intervals until you run out of interval rotation.
Summary
Frozen shoulder is likely caused by a number of factors and may even describe different conditions to varying degrees.
Whatever combination is causing your particular issues, it’s worth looking at both broader lifestyle risk factors and specific exercises.
In the majority of cases this will lead to a successful recovery, as it did with Alessandra below.
“I have been working with Paul for the past couple of months on my shoulder. Because of COVID-19 all our sessions have been online. Paul was able to quickly identify various issues preventing my shoulder’s movements, and suggested exercises that are allowing me to get my movements back!”
Alessandra De Guio
Humanitarian capacity senior adviser
