
In part 2 of this shoulder injury rehab series, we look at how to assess and improve the function of your rotator cuff muscles.
In part 1 we discussed how to assess and address limits in scapula motion.
During part 2 we move outwards from the scapula (shoulder blade) to the muscles of the rotator cuff.
It probably goes without saying that I can’t see your shoulder and don’t know what your particular issue is. This information provides a thought process which you can apply to make improvements.
If any of the exercises cause you pain or discomfort, stop and reassess.
So what is the rotator cuff?
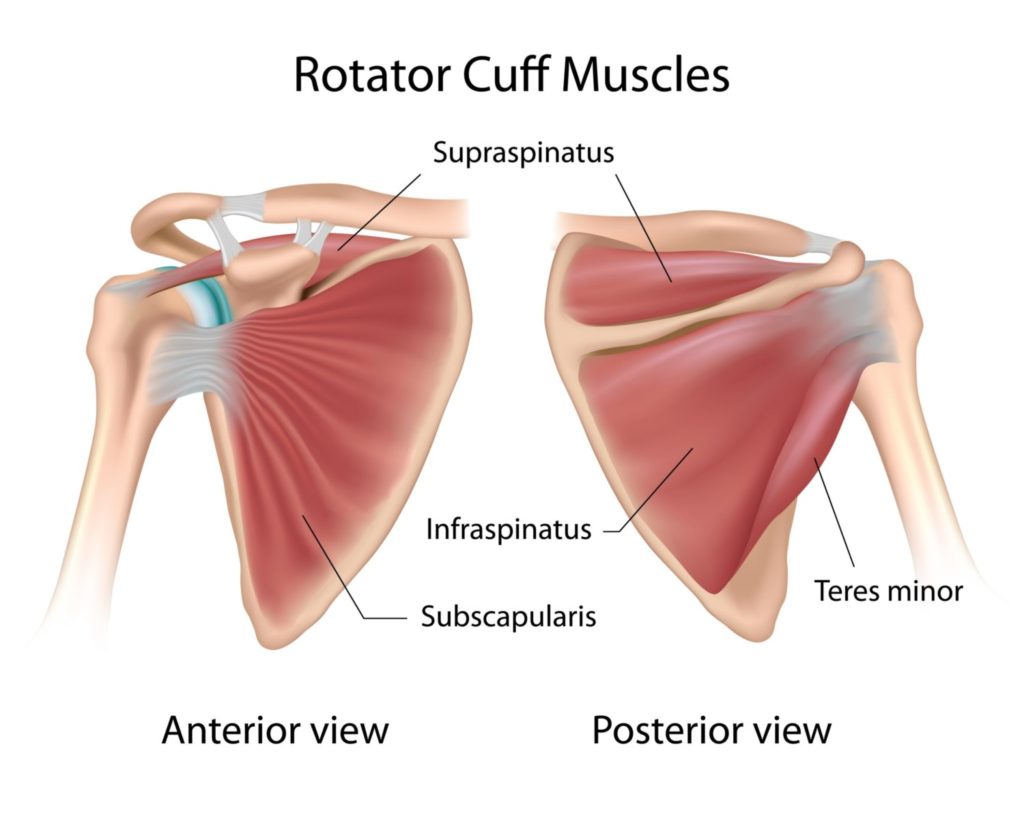
The rotator cuff is the term for four muscles that originate from your scapula and insert around the head of your humerus (upper arm). They include subscapularis, infraspinatus, teres minor and supraspinatus.
Together they are responsible for maintaining the head of your humerus in the shallow glenoid cavity of the scapula.
Think of them as the managers of the shoulder joint, which is why they are our next priority.
How to assess rotator cuff function
As we did in part 1, we’ll use range of motion to detect deficiencies in muscular system function.
Where we see asymmetries in range of motion (when comparing one shoulder to the other) we’ll ascribe those differences to deficits in rotator cuff function.
There are two primary motions produced by the rotator cuff muscles, that of internal glenohumeral rotation and external.
The muscles that attach below the head of the humerus are also capable of producing adduction of the humerus (moving the arm closer to the body).
Supraspinatus in contrast, provides assistance to the deltoid muscle in abduction (movement away from the body), due to its attachment on the top of the humerus.
Abduction will also bias different muscles and indeed divisions of those muscles, so we’ll use it to more accurately locate deficits.
Internal glenohumeral rotation
Let’s first assess internal rotation, which in terms of the rotator cuff, is primarily governed by subscapularis.
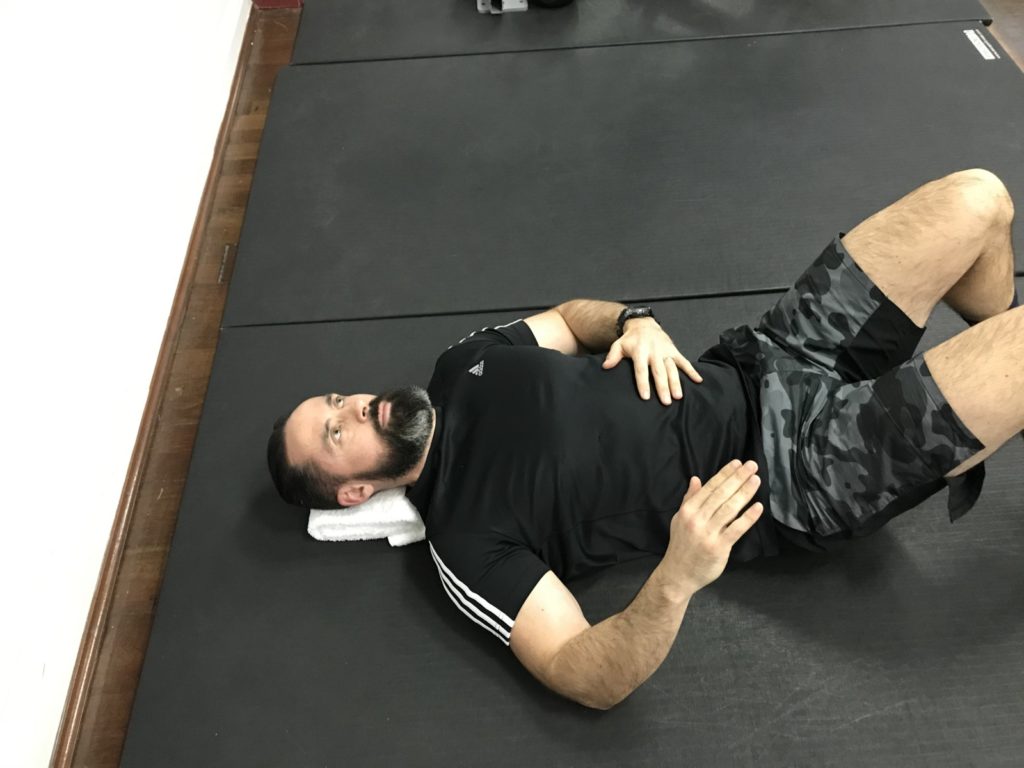
Lying on your back with elbows bent to 90 degrees, slide one arm away from your body to 45 degrees abduction.
Keeping your scapula on the floor, slowly rotate your arm inwards as far as it will go.
Note the distance between your forearm and the floor.
Now repeat on the other side.
Was there a difference in range of motion?
Did the movement feel more difficult on one side compared to the other?
Was the motion associated with any pain or soreness?
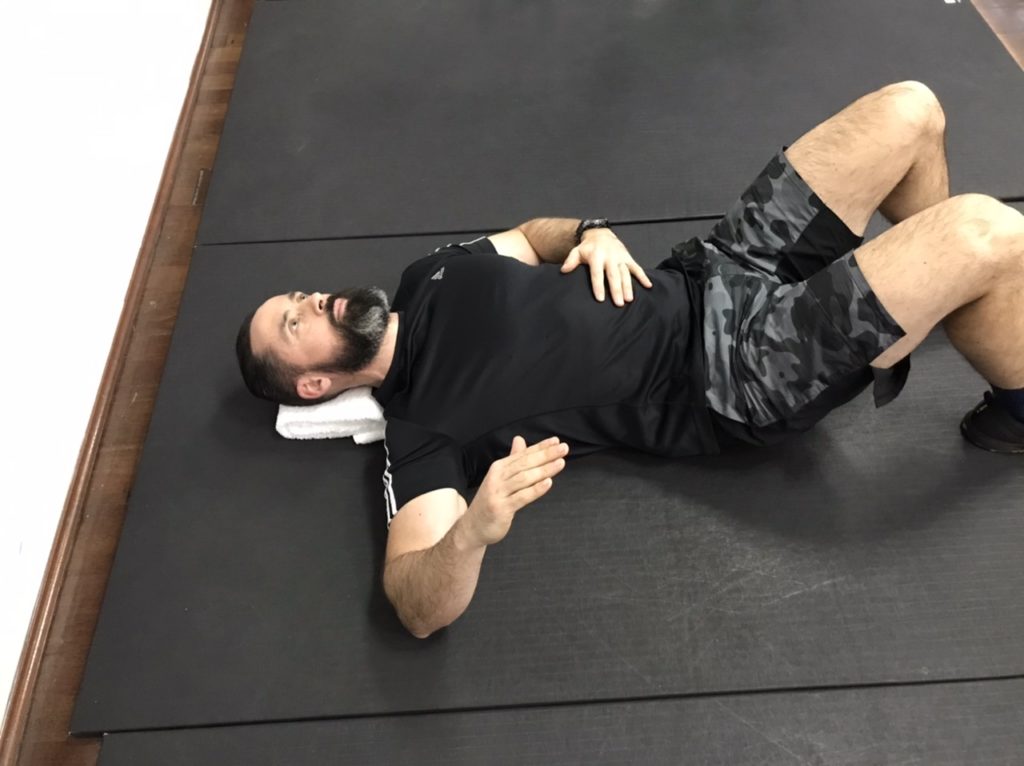
Now move the arm up so it’s level with your shoulder at 90 degrees abduction.
Repeat the same range of motion check and compare each side.
If you have difficulty getting to 90 degrees of abduction, make a note of it. In Part 4 we’ll show you how you can improve that range of motion.
For this assessment just compare motion at the angle of abduction you can comfortably achieve.
What did you find?
Note at what angle the range of motion difference was the greatest.
External glenohumeral rotation
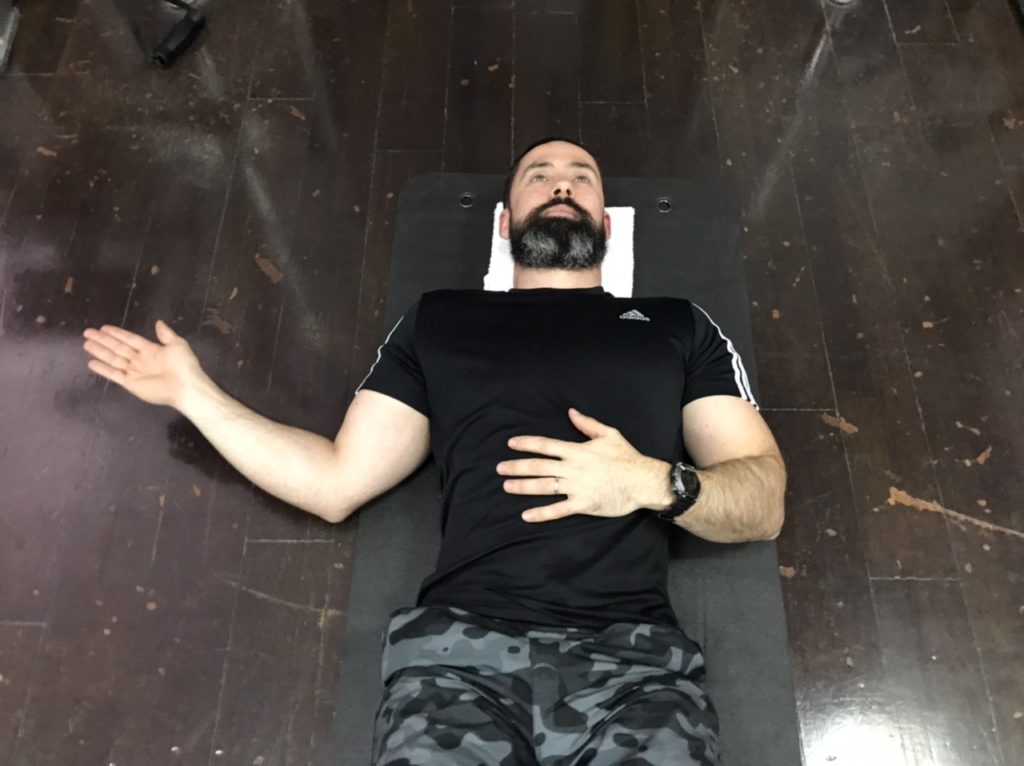
Lay down again with your elbows at 90 degrees and you arms by your side.
Keeping your scapula flat to the floor, this time rotate one arm outwards so your forearm moves away from your body towards the floor.
Note the angle between your forearm and the floor.
Now repeat on the other side. Again note the range of motion you were able to achieve and how that motion felt.
Repeat this same process with your shoulder at 45 degrees abduction and at 90 degrees.
Results
What did you find?
Did you notice any positions where motion was particularly different on one side compared to the other?
Were these on the shoulder you’re having issues with?
Providing there are no structural differences between each shoulder, we’ll assume these limitations represent deficits in the muscles responsible for that motion.
It’s these deficits that we will seek to improve with isometrics.
Isometrics are muscular contractions without motion at the joints those muscles act upon.
They are particularly useful when addressing limits at the rotator cuff because they reduce the need to control other joints whilst performing the exercise.
Isometrics for rotator cuff limitations
First select the biggest limitation on the shoulder that gives you issues.
Commonly this will be external rotation at 90 degrees abduction, so we’ll use that as an example.
You may even struggle to achieve 90 degrees of abduction on your symptomatic side.
If that’s the case, move your arm a little closer to your body until you can externally rotate the shoulder without issues.
When you’ve found a position that is comfortable, externally rotate your shoulder to its limit.
Now find something of a suitable size and shape to slot between your upper arm and the floor.
In the image below we’re using yoga blocks.
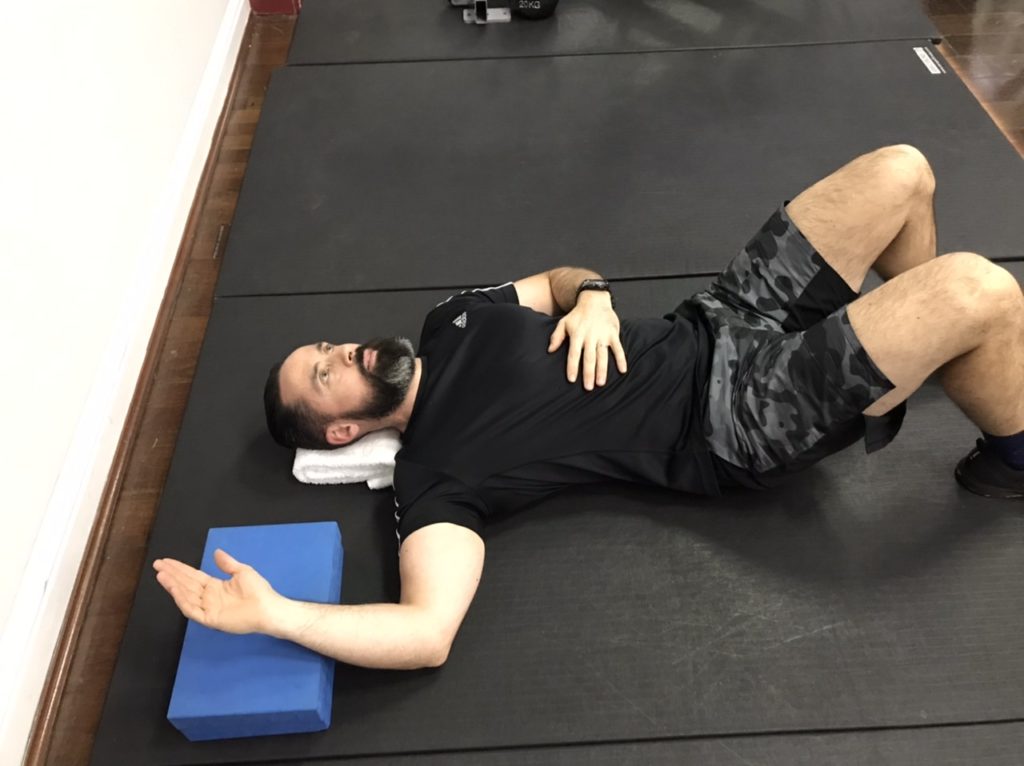
Gently rotate your arm back into the object.
Picture your upper arm rotating and focus on keeping your scapula perfectly still. The muscle we are looking to affect sits within a fossa on the outside of the scapula.
Hold the contraction 5 seconds and repeat a further 5 times. You may need to reduce the height of the object you’re pushing into as your ability to contract the muscle improves.
For each limit you discover use the same method.
Assess where the biggest limit in range of motion occurs, when compared to your other side.
Find an object to push into that won’t move as you apply a light force.
Perform 5 x 5 second gentle contractions, reducing the size of the object you push into as your range of motion improves.
Exercises to improve rotator cuff strength
Once you’ve improved the ability of your rotator cuff to produce effective contractions, it’s time to add resistance.
You’ll no doubt have noticed that exercises for these muscles usually involve resistance bands.
That’s a mistake as I explain in this post on the subject.
To summarise, bands are of limited benefit for the simple reason that the more you pull them, the greater the resistance they provide.
This can result in parts of the muscle’s range remaining unchallenged and other parts receiving too great a force.
We’ll use either a cable machine or dumbbells for resistance and build the exercises so the muscles receive an appropriate challenge throughout their range.
Select the exercise for the limit you discovered
Below you’ll find exercises that correspond to the range of motion tests you used above.
Select the exercise that matches the position you used isometrics to improve.
Of course you can use every exercise if you choose to do so. The greatest benefit will come from using resistance to challenge the weakest position however.
Exercises to challenge internal rotation
Supine at 45 deg abduction
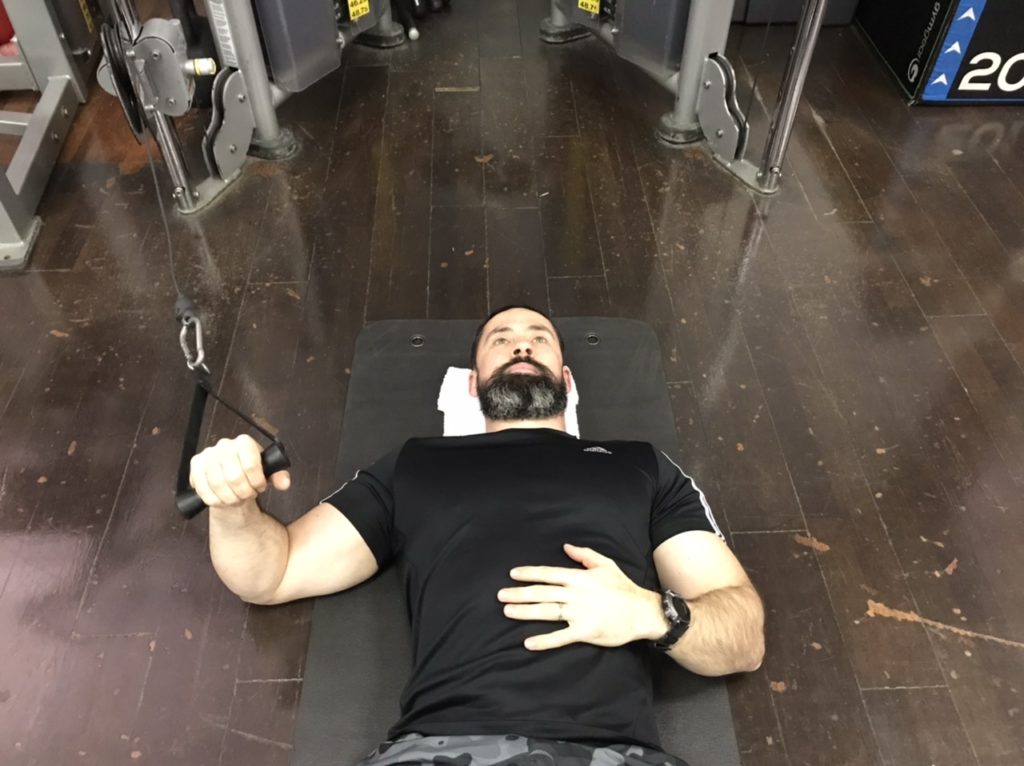
Position your shoulder at 45 degrees of abduction.
Have your elbow at 90 degrees and the cable running in line with your forearm from the height shown in the image above.
This will provide the muscles with the appropriate challenge throughout their range.
Ensure the cable doesn’t take you further back into external rotation than you can take yourself and that your scapula remains in contact with the floor throughout.
Your shoulder should not rise from the floor when you perform the exercise.
Use a resistance that brings about fatigue between 6-8 repetitions.
Supine at 90 degrees abduction
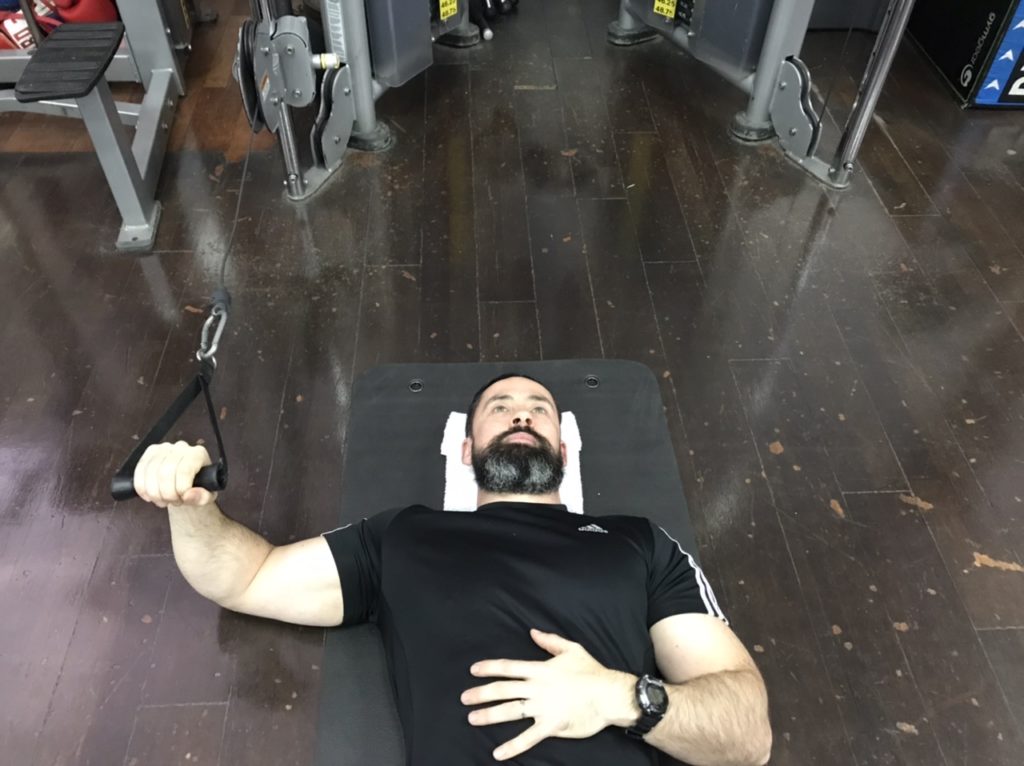
Position your shoulder at 90 degrees of abduction, or as close to it as possible.
Have your elbow at 90 degrees and the cable running in line with your forearm from the height shown in the image above.
This will provide the muscles with the appropriate challenge throughout their range.
Ensure the cable doesn’t take you further back into external rotation than you can take yourself and that your scapula remains in contact with the floor throughout.
Your shoulder should not rise from the floor when you perform the exercise.
Use a resistance that brings about fatigue between 6-8 repetitions.
Exercises to challenge external rotation
Side lying DB external rotation
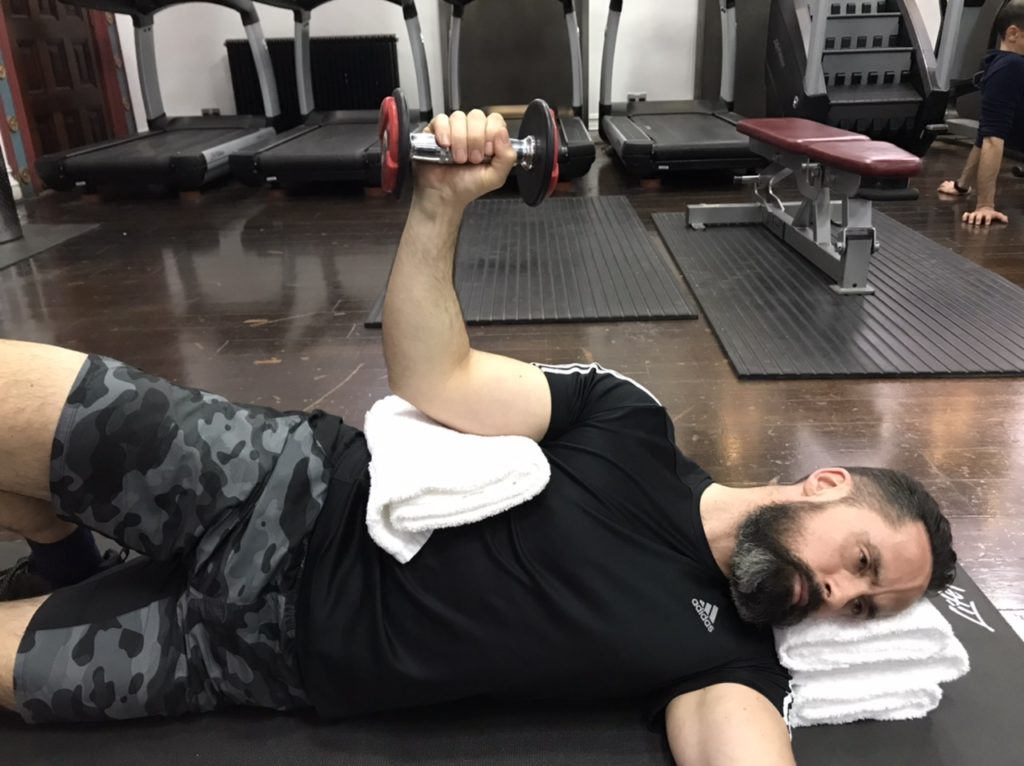
Lying on your side, place a small towel between your elbow and your trunk.
With your elbow at 90 degrees, externally rotate your shoulder until your forearm is perpendicular to the floor.
If you don’t have enough external rotation to achieve this, rotate your body back to accommodate for this.
This will ensure the target muscles receive an appropriate challenge throughout their range.
With a dumbbell in your hand, slowly rotate your shoulder inwards without shifting your elbow.
When you’ve reached your limit of active internal rotation, slowly begin to externally rotate your shoulder to return to the start position.
Choose a dumbbell that brings about fatigue between 6-8 repetitions.
Side lying DB external rotation @ 45 degrees abduction
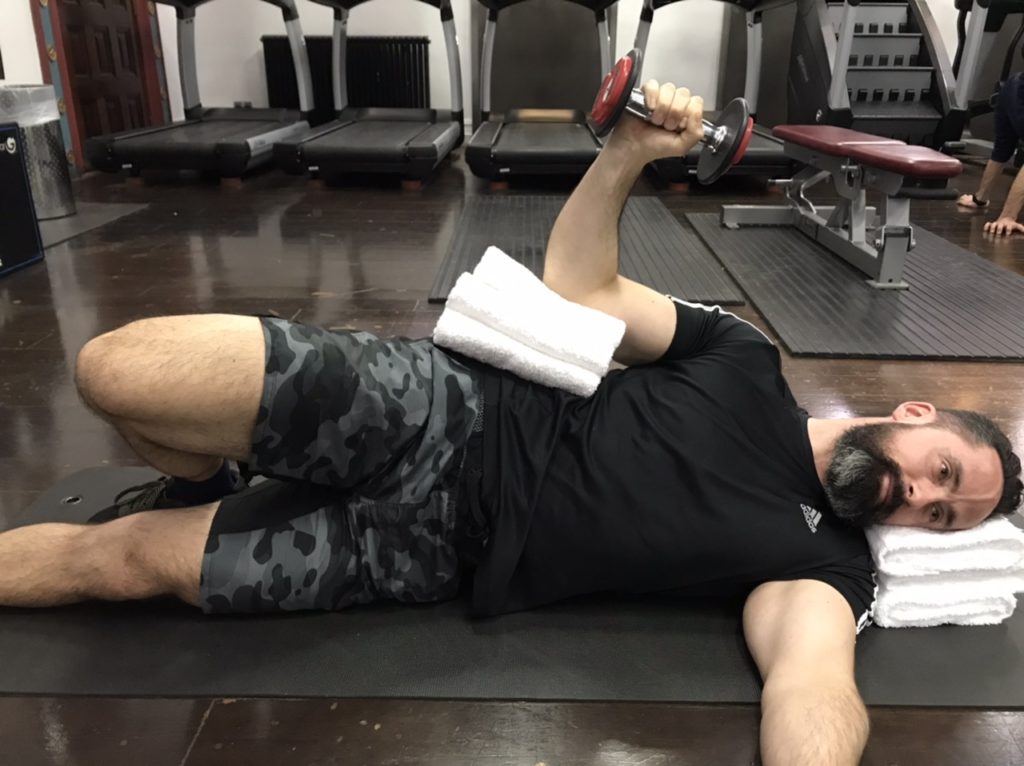
Lying on your side, place 2 or 3 towels between your elbow and your trunk to put your shoulder in around 45 degrees of abduction.
Externally rotate your shoulder until your forearm is perpendicular to the floor.
Again if you don’t have enough external rotation to achieve this, rotate your body back a little to accommodate for this.
This will ensure the target muscles receive an appropriate challenge throughout their range.
With a dumbbell in your hand, slowly rotate your shoulder inwards without shifting your elbow.
When you’ve reached your limit of active internal rotation, slowly begin to externally rotate your shoulder to return to the starting position.
Choose a dumbbell that brings about fatigue between 6-8 repetitions.
DB external rotation @ 90 degrees abduction from a bench
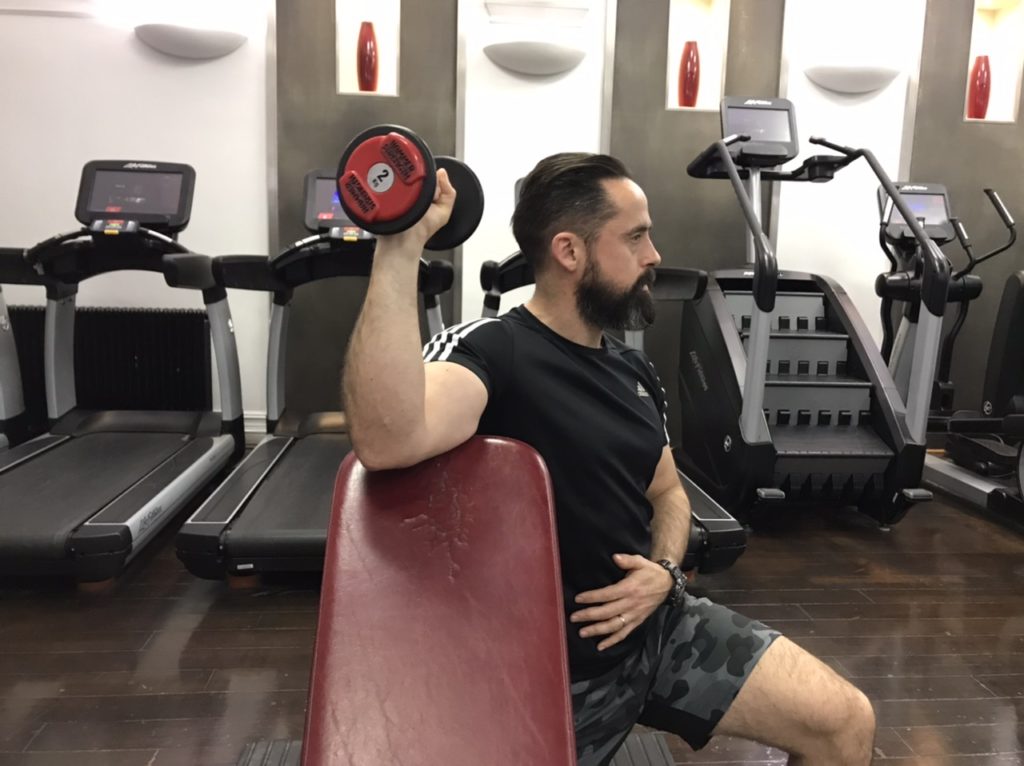
Place your upper arm on an inclined weight bench as shown.
Ensure the bench supports you in the amount of shoulder abduction that you have available, whether that’s 90 degrees or slightly less.
Externally rotate your shoulder so your forearm is perpendicular to the floor.
If you don’t have enough external rotation to achieve this, move your torso back slightly to accommodate for this.
With a dumbbell in your hand, slowly rotate your shoulder inwards without shifting your elbow.
When you’ve reached your limit of active internal rotation, slowly begin to externally rotate your shoulder to return to the starting position.
Choose a dumbbell that brings about fatigue between 6-8 repetitions.
Summary
In this series we’ve now assessed and improved the function of the muscles that move your scapula and those of your rotator cuff.
In part 3 we’ll look at how you can integrate these improvements into training the motions of pressing and pulling.